This article should explain how to manually backup your WordPress site. I used this method to transfer this site from FatCow hosting to now hosting this site and others on the Microsoft Azure platform.
Backup WordPress Database using phpMyAdmin
The database is the most valuable part of your website. This contains all information that will change most often. Luckily, backing up your WordPress database is pretty straight forward and can be done using a handy tool called phpMyAdmin, which is usually available through your cPanel.
Let’s dive into the steps:
Log in to your cPanel and click the phpMyAdmin icon in the Databases section.
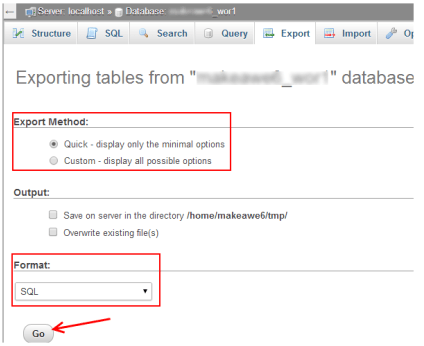
In phpMyAdmin you will see a list of database names in the left column of the home page. Simply click on the database that you wish to back up and select the Export tab at the top of the screen.
Make sure the export method is “Quick”and the format is “SQL”
Click Go button. This will download a .sql file to your computer.
The download process can usually take from a few seconds to a few minutes, depending on how large your database is. The downloaded SQL file can be used to import at anytime when you need to restore or migrate your site.
Alternatively, if you’re not comfortable with the steps, or familiar with phpMyadmin, you could also backup your database within your WordPress admin panel. To do this,
Head to WordPress dashboard » Tools » Export » All content and click download export file. This will download a XML file to your computer. This file contains your posts, pages, comments, custom post types, categories, tags, and users.
However, you can’t deny the fact that phpMyAdmin is the best and efficient tool to backup your WordPress database.
Backup WordPress Files (wp-content)
To access wp-content you’ll need either an FTP client or cPanel file manager. Let’s start with File manager tool:
Option 1: Backup your wp-content folder using File manager
Login to yourcPanelaccount.
Navigate to File Managericon under the “File Management” section.
Click on it and a pop-up will appear. In the pop-up, select Web Root (public_html/www)and click Go.
The File Manager will now load in a new window and show your files. Ensure you are in the public_htmlfolder.
Once there, navigate to the “wp-content”folder, right-click on it and select “Compress”.
Select Zip Archive as compression type and then click compress File(s). This will create a file called wp-content.zipand place it within your root folder.
Wait for the archiving to finish. When it’s ready, refresh the file manager and look for wp-content.zipfile. (By downloading the wp-content.zip file that you need the time taken to complete the backup will be significantly reduced.)
Simply double click on it to begin download.

This might take a long time, maybe an hour or more depending on your connection speed and the size of your website. Once done, don’t forget to delete the zip file in your root folder to save disk space.
Option 2: Backup your wp-content folder using FTP (FileZilla)
This part of the article assumes you already have an FTP account and Filezilla software installed on your computer. If you don’t have CPanel access on your host, you will have to get yourself an FTP client such as Filezilla. FTP clients let you move your website’s files from your hosting account to your computer, and vice versa
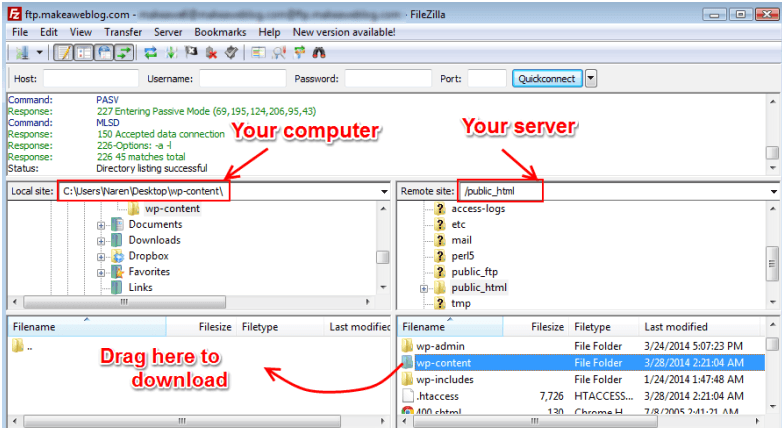
Open Filezilla and connect to your host with your FTP information.
After you have connected, select the public_html directory from the right pane.
Create a folder on your desktop and download the wp-content folder to it by simply dragging the folder over from the right pane to the left pane.
Congratulations, you’ve successfully backed up your WordPress site.