The problem
For those who might not be familiar with the problem of database connection management in a serverless environment, let’s explain it briefly.
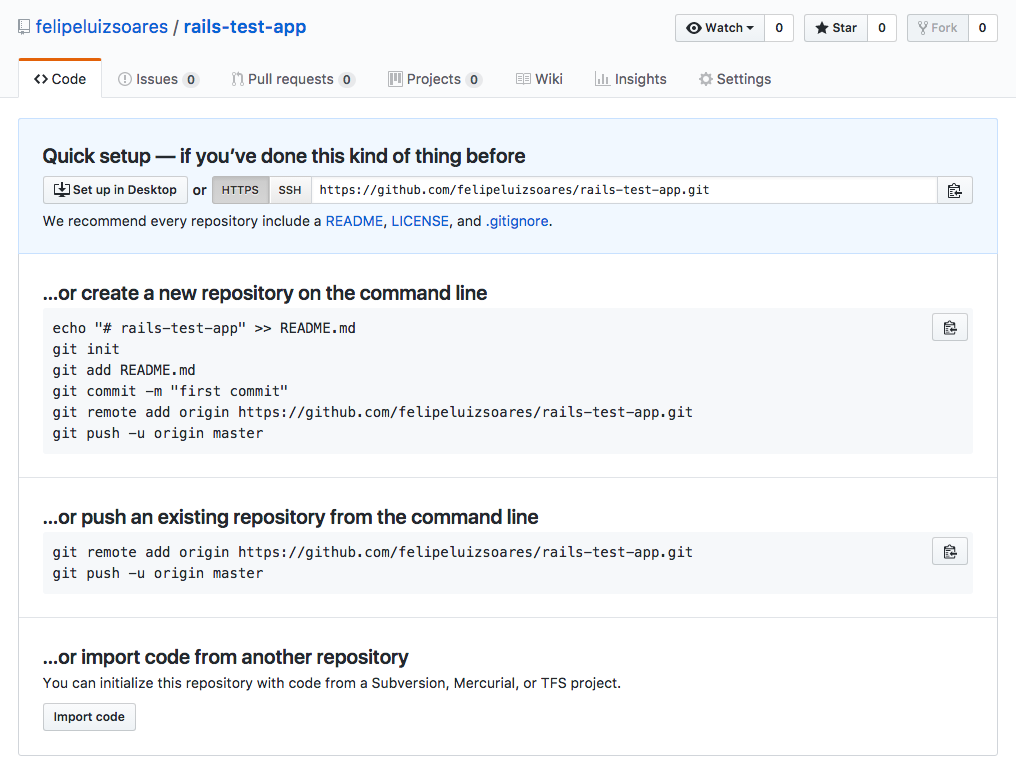
Code used in this article can be found at: https://github.com/matjamesymj/aws-lambda-to-mongo-db
With Lambda functions (or any FaaS in general), unfortunately, things can get a little tricky when you have a function that works with a “traditional” database, like for example MySQL or MongoDB.
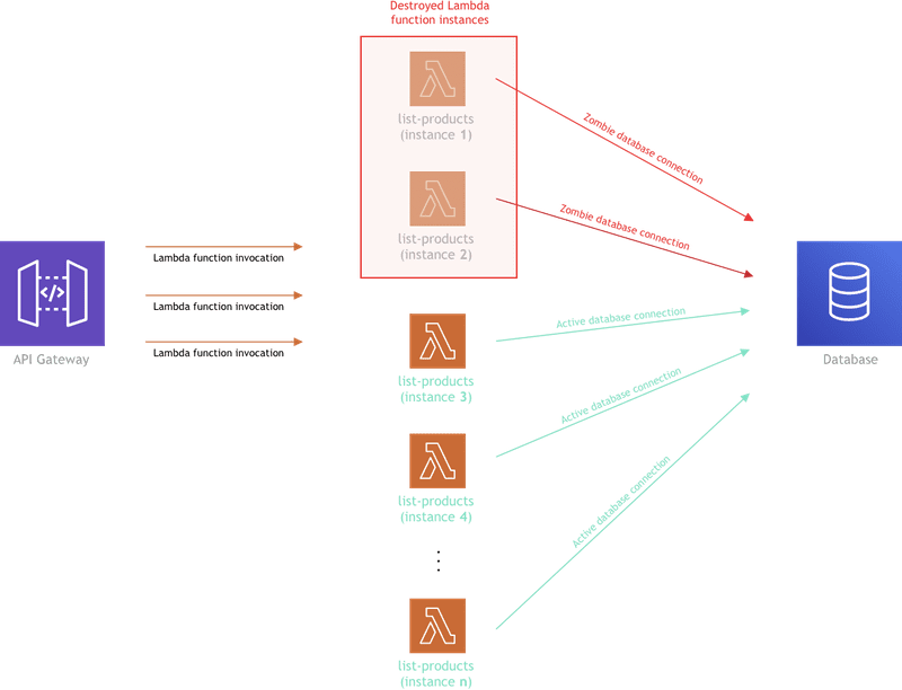
Basically, every time a Lambda function is invoked for the first time (or a new function instance is created because of a concurrent invocation), we need to establish a new connection to our database. While there is nothing wrong with that, the problem arises when we have to close it.
As some of you may know, after a period of inactivity, Lambda functions get destroyed and when that happens, the database connection, unfortunately, doesn’t get closed, and basically enters the “zombie” mode. In other words, the connection is still there, but no one is using it.
And over time, as this scenario repeats, the number of these “zombie” connections may significantly rise, to the point that you can reach the limit for maximum established connections defined on your database server. Because the database can basically become inaccessible at that point, this can obviously create serious problems for your app.
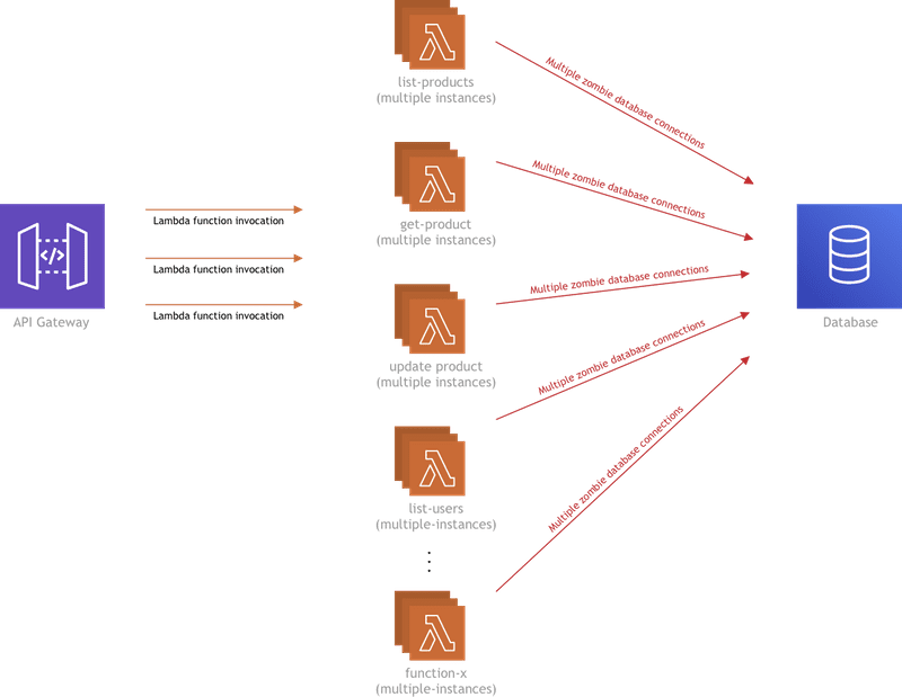
The above diagram shows multiple instances of a single Lambda function. But in a real-life, there will be more than one Lambda function in the mix, and that’s when it gets even more worrying.
Any known solutions?
Although there are a few solutions for some databases today, like e.g. AWS Serverless Aurora’s Data API, or recently announced RDS Proxy for AWS’s relational databases, the managed MongoDB hosting service that we are currently mostly relying on, the MongoDB Atlas, doesn’t offer a similar solution. They do list some best practices in this article, but it’s an old article, and it doesn’t really solve the problem.
More recently Amazon DocumentDB (with MongoDB compatibility).
Introducing DB Proxy Lambda function
Enter “DB Proxy” Lambda function — a Lambda function that serves as a database connection proxy (as you can probably tell by its name). In other words, every function that needs to talk to the database, won’t actually establish its own database connection anymore, but will invoke the mentioned DB Proxy Lambda function whenever a database query needs to be made, with all of the query params sent via the invocation payload. Once invoked, the DB Proxy Lambda function will run the query using the standard MongoDB Node.js driver, and finally, respond back with the query results.
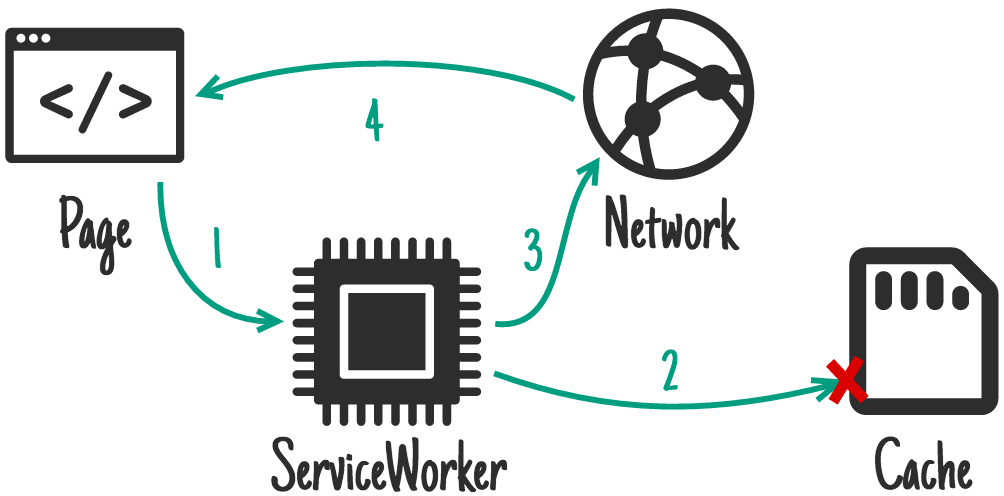
The following diagram basically shows how it all works together:
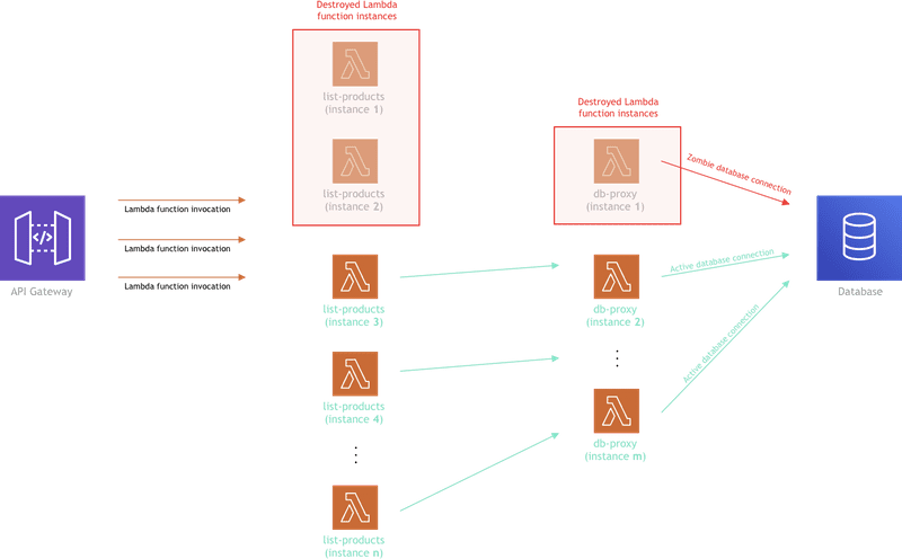
One thing to note here is that, as you might have noticed, zombie connections will still exist, because, at some point in time, DB Proxy Lambda function instances will still get destroyed, thus the same problem repeating. We are aware of that, but our goal is not to make the number of these zombie connections go to zero, but to try to make this number as small as possible.
First, we decided to see how all of this performs in terms of speed, because if it turns out that invoking another function to do a simple database query is slow, then there’s no point in further exploration of this idea, wouldn’t you agree?
Performance
When this idea came up, an immediate concern was that by invoking another Lambda function to execute database queries (instead of doing it like we always did, using the MongoDB Node.js driver), we would introduce significant latencies and thus negatively impact the overall performance.
But as it turned out, it’s not bad at all! Yes, there is the additional latency if we are hitting a function cold start and in that case, function initialization and a new database connection establishment, but other than that, for our needs, we’ve considered the performance to be in the acceptable range.
Let’s check it out!
Database connections
So, after some testing, by checking the MongoDB Atlas dashboard, we’ve noticed that the total number of established database connections really did decrease.
More benefits
So, with the shown performance and database connection management testing results, we’ve considered this whole experiment to be successful, and that’s why we’ve decided to keep this solution, so our users can utilize it and make their apps more reliable.
But that’s not all actually. This approach added even more benefits than just the database connection management problem we’ve initially set to solve. Let’s check it out!
Maximum number of connections can be defined
Since connections are now established only from the DB Proxy Lambda function, by utilizing the reserved concurrency (which lets us define the maximum number of concurrent function instances), we now have the ability to control the maximum number of connections that can be established.
For example, if we were to set the reserved concurrency to 100, this means we can have up to 100 concurrent DB Proxy Lambda function instances, which in other words means we can have up to 100 active connections at the same time. Pretty cool right?
But still, as mentioned, do note that the DB Proxy Lambda function instances will be destroyed at some point in time, which will again leave zombie connections behind. So the actual number of total open connections to the database server may be a bit higher than the one set as the function’s reserved concurrency.
Also, except for the fact that the DB Proxy Lambda function instances are destroyed due to inactivity, they are also destroyed upon deployments. For example, if you had 100 active DB Proxy Lambda function instances, redeploying the function would destroy all of these instances, and depending on the actual traffic, create 100 new ones. This means 100 new connection establishment requests! So make sure to have that on your mind if the DB Proxy Lambda function redeployment is necessary.
This also brings me to my next point…
Redeployments don’t create new connections
Occasionally, we might need to deploy several services, which might be comprised of several functions. If we were to deploy 20 new functions, and if all of them were talking to the database, that would basically mean we’ll get 20 zombie connections after the deployment has finished (assuming we have only one instance of each function), and establish 20 new ones. Things get even worse if you had to repeat the deployment once or twice.
With this approach, this problem basically disappears, because, unless we have to make some changes to the DB Proxy Lambda function, we don’t usually need to deploy it again, which means the same already established connections will be reused by the redeployed functions.
Smaller functions
Previously, all functions that needed to talk to the database had to include the mongodb package, which is actually 1.18MB in size. If you had a function that’s 5MB in size, that would actually represent 23.6% of the function’s total size! Massive percentage if you ask me.
Since functions don’t need to include the mongodb package anymore (it’s only included in the DB Proxy Lambda function, which is basically its only dependency), all functions are now lighter in total bundle size, which is also a cool benefit.
Increase of Lambda function invocations?
Before I wrap this up, I just wanted to quickly cover one more thing.
You might be asking yourself:
Wait, isn’t this approach going to increase the total amount of Lambda function invocations? Can this impact my monthly costs?
Wait, isn’t this approach going to increase the total amount of Lambda function invocations? Can this impact my monthly costs?
Yes, that’s true, and unfortunately, there is no way around it. Every database query is a new Lambda function invocation. That’s why, if you will be implementing something like this, try to estimate how many invocations you might have, and how it might affect your monthly cost.
The cool thing about the DB Proxy Lambda function is that it doesn’t require a lot of system resources. In fact, you should be just fine with a minimum of 128MB of RAM. And since every invocation should last less than 100ms, the first one million invocations are going to be free (if we’re not including the invocations of other Lambda functions that you might have).
The AWS Lambda free usage tier includes 1M free requests per month and 400,000 GB-seconds of compute time per month.
The AWS Lambda free usage tier includes 1M free requests per month and 400,000 GB-seconds of compute time per month.
Also, if you have functions that are doing several database queries in a single invocation, if possible, try to fetch all of the needed data in one invocation. Not only this will generate fewer function invocations, but will also be faster.
All in all, this is definitely something to be mindful of, but for now, we didn’t find it to be a deal-breaker.
Conclusion
As seen, once we’ve implemented the shown DB Proxy Lambda function solution, we’ve noticed a significant reduction in the number of zombie connections. And not only that, but we’ve also gained some really nice features and optimizations along the way.
If you ask me, I think it would be super cool to see a more “official” solution to the database connection management problem from the MongoDB Atlas team, like for example something similar to the Data API that the AWS Serverless Aurora offers. I feel it’s kind of a shame that something like that still doesn’t exist, but I do hope they will come up with something in the near future. 🤞
We are aware that there are other serverless-first databases out there that don’t suffer from this problem. For example, the awesome DynamoDB (in fact, there’s an open issue already) or maybe even FaunaDB (not tried it yet, but heard good things). But for now, we’ve decided to rely on MongoDB as the go-to database, due to its popularity, and the fact that it can be used with every major cloud provider (it’s not a cloud-native database).
We will definitely keep a close eye on this issue, and keep monitoring the serverless space for new solutions that eventually may come up. And because listening to our community is one of our top priorities, if there’ll be more interest/demand, I can definitely see some changes happening in this segment.
Load testing experiment
We will run the same load test against 2 sets of lambdas and see how they perform in a load test scenario:
The first set of lambdas: getNote and GetNotes will both connect to the database within each lambda. The second set of lambdas: getProxyNote, getProxyNotes will both use a mongoDbProxy lambda for db access.
The results should a significant drop in db connections when using a mongo db proxy lambda. The results would be far greater if we introduced additional lambdas accessing data via this proxy also.
Jmeter Profile
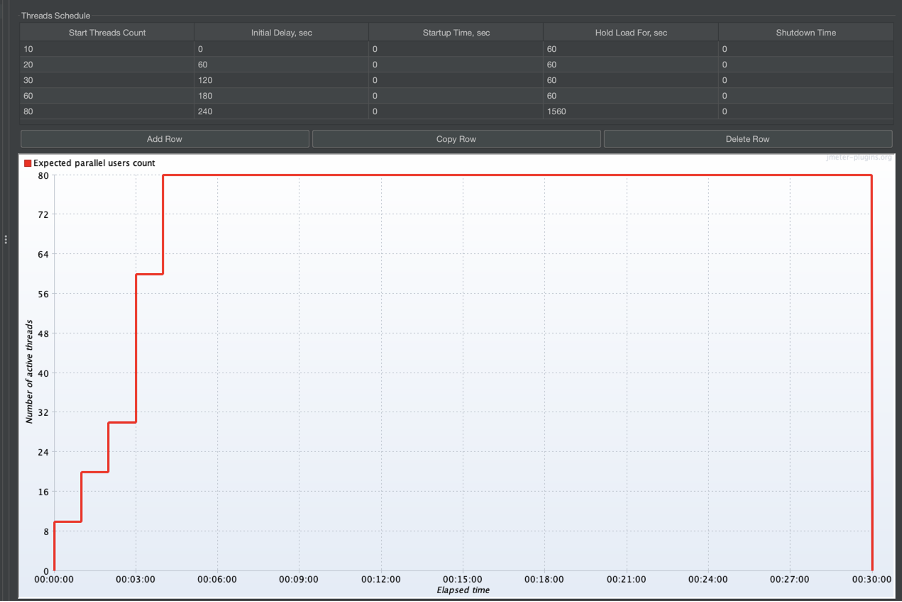
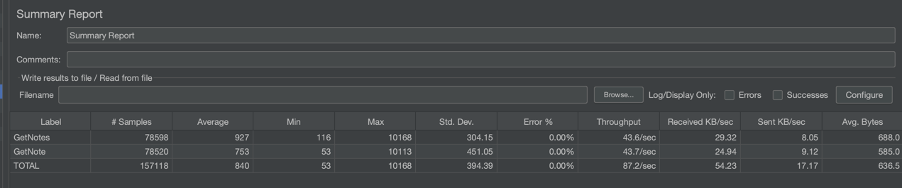
Results from not using a proxy mongo lambda
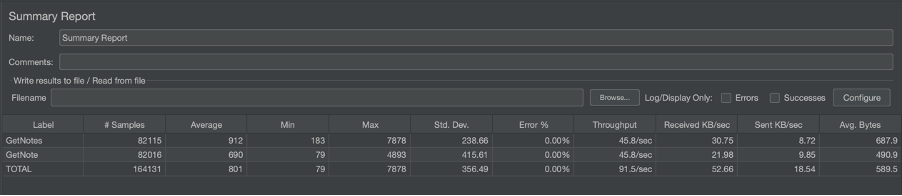
Jmeter stats
Mongo db connections
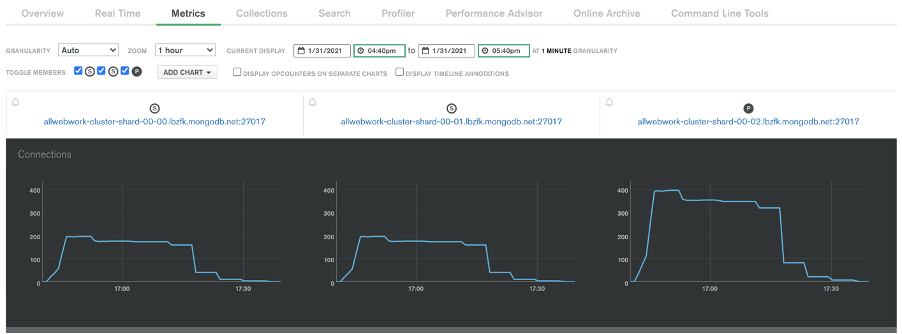
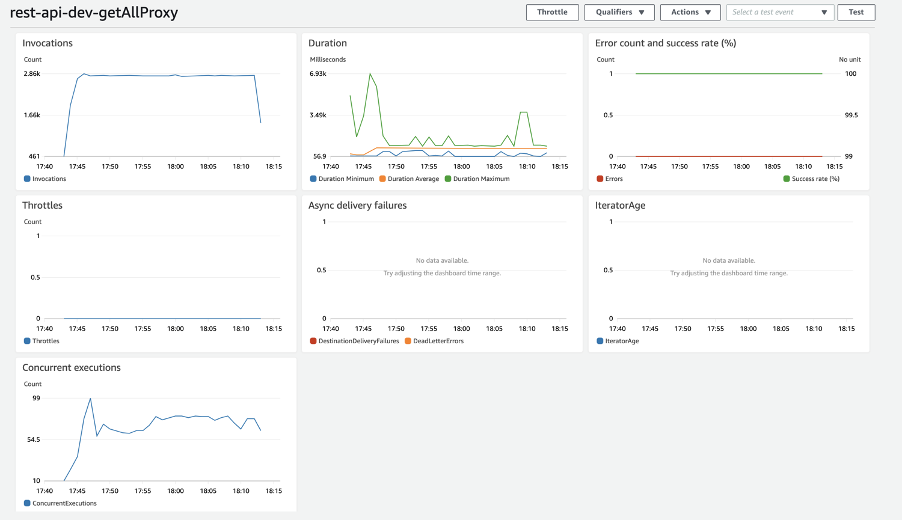
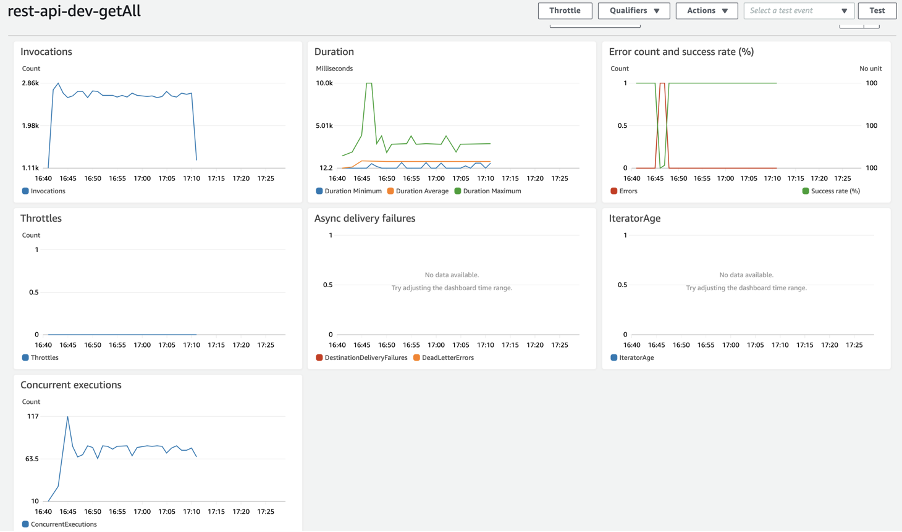
AWS dashboard view
Results from using a proxy mongo lambda
Jmeter stats
Mongo db connections
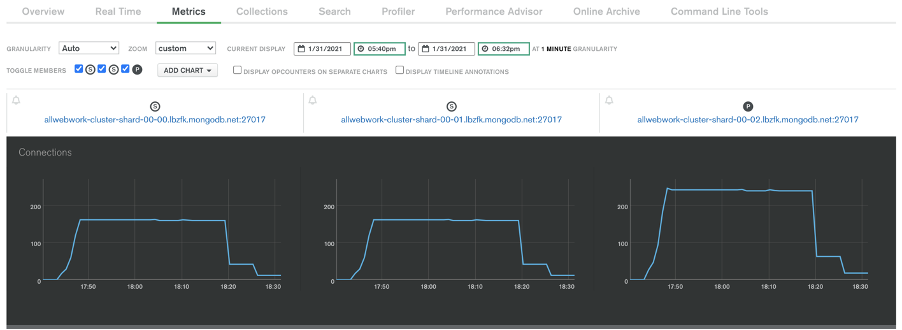
AWS dashboard view